For 5 years, we've been traveling Europe with a rooftop tent. I describe how we upgraded our setup with a solar panel, what gadgets we recommend, and how much it all costs. Practical advice for vanlife and overlanding enthusiasts.
Table of Contents
When COVID hit, we made a decision that changed the way we travel – we bought a Wild Land Desert Cruiser 120 rooftop tent. We mounted it on our SUV, and for the past five years, that’s how we’ve been exploring Europe. We were tired of rigid planning and booking apartments months in advance. After a few unpleasant experiences with Airbnb and Booking.com, we decided that formula had simply run its course for us.
In this post, I want to share our experiences: how I built up our travel setup step-by-step, what and how we pack, and our plans for the future. There will also be a handful of proven tricks and recommended gear, complete with approximate costs. Maybe it will inspire someone.

Our First Setup: Tent and Awning
Base Cost: Our first complete setup (Wild Land Desert Cruiser 120 tent, Thule roof bars, awning) cost a total of around 13,000 PLN (approx. €3,000 / $3,250). Note: Currency conversions are approximate and based on rates at the time of writing.
Our tent is a model with a built-in LED strip, a convenient side entrance, and a factory mattress. Its aluminum frame and gas struts allow for lightning-fast setup. Crucially, when it’s folded, I can easily drive into my garage. For removal, it only takes one person and a Thule lift system to winch it up to the ceiling. When deployed, the tent stays within the car’s footprint, which is a huge advantage. The roof also features T-slot tracks, which are perfect for mounting additional accessories—something I later used for the solar panel installation. One of the first upgrades was an anti-condensation mat under the mattress; it was a game-changer for sleeping comfort.

To complete the setup, we initially bought a simple, manually deployed awning. Its downsides were that it took up space in the car and required time to set up. The upsides? A low price and rock-solid durability. Our setup survived hurricane-force winds in the Tatra Mountains and a two-day downpour.

It’s worth adding that the tent itself, when positioned correctly, provides a good amount of shade—enough for a small table and two chairs. That’s why I gave up on permanently mounted side awnings. On our model, it would obstruct the entrance, and simple canopies without side walls are more like toys for sun protection than real shields against persistent rain.
The Art of Choosing a Campsite and Planning
The foundation of this type of travel is checking the weather forecast—we regularly follow services like ICM and Ventusky. We’ve also developed our own system for selecting campsites. Price isn’t the main criterion; we care more about location, reviews, and low occupancy. We look for gems with basic standards but in beautiful places.

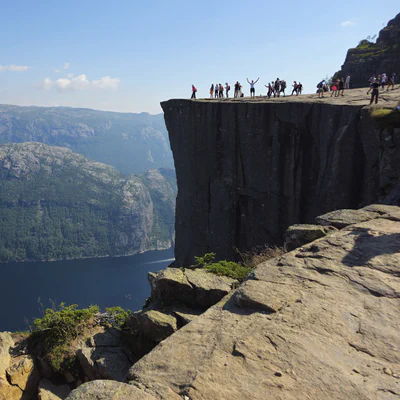
Once in Norway, we drove an extra 50 km, passing several campsites along the way, to reach that one hidden spot by a fjord. Of course, this approach can be risky. Sometimes you have to call ahead, and even then, we’ve been greeted by a “No Vacancy” sign. Fortunately, a bit of social engineering and our “never surrender” rule have always allowed us to find a solution.
The Energy Question: A Solar Panel Saga
Very quickly, we felt the absence of one key element: a refrigerator. We bought a YOLCO compressor model, which immediately created another need: a constant source of power. This was the impetus for intensive research into solar panels. I ruled out portable panels (I didn’t want to babysit anything) and decided on a permanent installation.

The prototype sketch I sent to a friend to visualize the concept.
After watching dozens of YouTube videos, I rejected the idea of flexible (flex) panels. I chose a rigid-frame panel with tempered glass—it’s heavier, but for similar quality, it’s about three times cheaper and much more durable. Weight is a serious issue (the dynamic roof load capacity is about 100 kg, and the tent itself weighs 50 kg), as is efficiency in the shade. If you choose the cheapest panel with poor performance, you’ll shoot yourself in the foot.
Contrary to many YouTube tutorials, I advise against buying the cheapest equipment. I opted for a reinforced, certified panel that won’t crack under the stress and speed of highway driving. Remember, the YouTuber won’t pay your fine if your installation falls on someone’s head.
Mounting the Panel: From Mad Max to Ideal
The safest solution seemed to be mounting the panel with S-shaped flat bars that would align it with the roof bars. The problem? Nobody in Poland offered such brackets, and importing them from Australia was prohibitively expensive. A handyman friend came to the rescue.


We bought some flat bars, which were then cut, welded, sanded, and painted. The final result exceeded my expectations. After driving 20,000 km, I can say that everything is holding up perfectly. My only initial mistake was mounting it too low, which I fixed by raising the whole assembly by 1 cm.

Power Station and Real-World Performance
Energy Cost Breakdown:
- Rooftop Solar Panel: 500 PLN (on sale) (approx. €115 / $125)
- Bluetti AC70P Power Station: ~2500 PLN (can be found for 1700 PLN on sale) (approx. €400-580 / $425-625)
- Emergency Portable Panel: 180 PLN (on sale, imported from China; typically 500-900 PLN) (approx. €40 / $45)
- The Alternative: No personal power means paying for electricity at a campsite (€5-10 / $5-10 per day) and potential hassles.
I didn’t want to mess with building my own systems, so I bought a Bluetti AC70p power station. It was a bullseye. The panel’s performance is excellent: in full sun, it generates up to 140W; in the shade, 60W; and even in a torrential downpour while driving on the highway, it was still producing 15W! The only hiccup was a Bluetti firmware bug, which was fixed under warranty. Now, I’m thinking about buying a new Bluetti battery that’s twice as large.

The panel can charge the station in 3-4 hours of full sun. However, I’ve run low on energy a few times. For such situations, I have an emergency 60W portable panel. Will I install a larger 400W panel? No. That’s an extra 22 kg and excess power. In a pinch, I can always charge the station from an outlet.

Gear That Makes a Difference: My Recommendations
Here are a few items that I particularly recommend after 5 years of testing.
Portable Solar Panels and Power Banks
Besides the main panel, I have two extras: a 120W suitcase-style panel (realistically 60W) and a tiny 60W one (realistically 15-20W) that fits in a backpack for emergencies. Additionally, I have a set of 4 power banks, two of which are small ANKERs that can each charge my S23 Ultra twice. This is a crucial backup for powering lights and phones when the main battery is running low.

Mikado Fishing Tackle Box
Cost: approx. 100 PLN (€23 / $25)
This is the unsung hero of our trips. It’s perfect for organizing kitchen gear. In the large compartment, we keep pots and dishes; in the top, we store knives, spices, and utensils. It’s sturdy enough to double as a small table or stool.


Berger Folding Stool
I once bought three of these on Allegro for 40 PLN. They are brilliant as stands for the tackle box, bags, or just for a quick sit-down.
Opinel and Morakniv Knives
The Opinel is a French legend and the perfect camping knife. The Morakniv is a fantastic knife for camp chores.


Gas System
I evolved from small cartridges to a dual-burner stove powered by a large gas cylinder. This provides huge cooking comfort. For shorter trips, I take a small suitcase-style stove that uses cartridges.


Nitecore Mosquito Repellent
Cost: 150-300 PLN (€35-70 / $40-75)
This gadget creates a protective zone around you, repelling mosquitoes, gnats, and ticks. It works worlds better than coils and is a healthier alternative to constantly spraying yourself with chemicals.


Other Essentials
- Anaconda 18L Water Canister: Two of these certified containers with a USB-powered pump tap provide us with a supply of clean water for several days.


- Ready-made Meals: Sometimes they come in handy. We’ve found a few Polish brands that are quite good. The topic of food deserves its own article.
- SU-2 Special Hardtack: Emergency bread when fresh is unavailable.

A package of SU-2 Special Hardtack, a type of military cracker. - Scho-ka-kola Chocolate: Created for the 1936 Berlin Olympics, this nutritious chocolate with a high caffeine content is the perfect snack for the road.

The iconic round, metal tin of Scho-ka-kola chocolate.


What’s Next? Plans for the Future
Our current setup provides us with complete independence for 1-2 weeks. The next step will be to build a trunk storage system—raising the floor by 20-30 cm to create a system of sliding drawers.
The last five years have been a continuous process of improvement. Every piece of our equipment has long since paid for itself, giving us something priceless in return: freedom and flexibility on our travels.